The post New Solutions & Innovations in Fashion and Home Decor AI appeared first on Ximilar: Visual AI for Business.
]]>Our AI-powered Product Description revolutionizes the way you manage your fashion apparel catalogs by fully automating the creation of product titles and descriptions. Instead of spending hours manually tagging and writing descriptions, our AI-driven generator swiftly produces optimized texts, saving you valuable time and effort.

With the ability to customize style, tonality, format, length, and preferred product tags, you can ensure that each description aligns perfectly with your brand’s voice and SEO needs. This service is designed to streamline your workflow, providing accurate, engaging, and search-friendly descriptions for your entire fashion inventory.
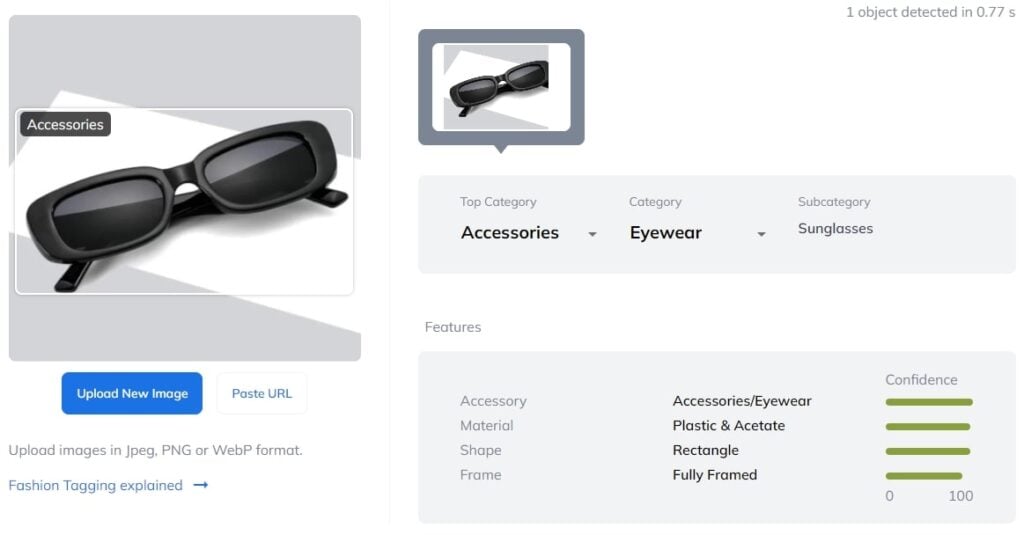
Enhanced Taxonomy for Accessories Product Tagging
We’ve upgraded our taxonomy for accessories tagging. For sunglasses and glasses, you can now get tags for frame types (Frameless, Fully Framed, Half-Framed), materials (Combined, Metal, Plastic & Acetate), and shapes (Aviator, Cat-eye, Geometric, Oval, Rectangle, Vizor/Sport, Wayfarer, Round, Square). Try how it works on your images in our public demo.
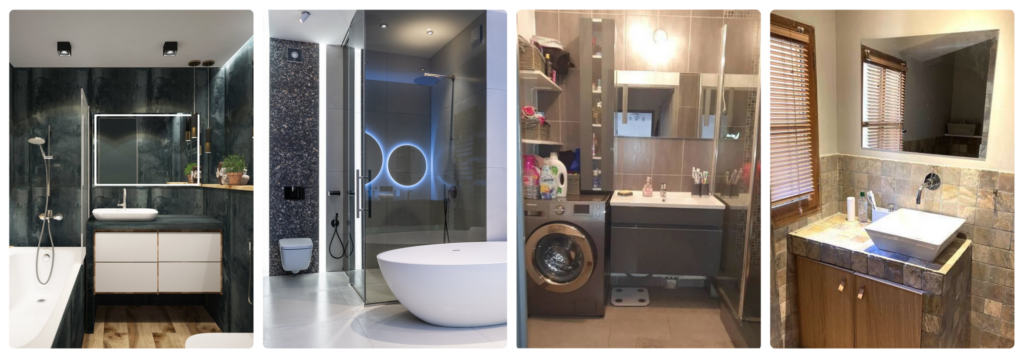
Automate Detection & Tagging of Home Decor Images With AI
Our new Home Decor Tagging service streamlines the process of categorizing and managing your home decor product images. It uses advanced recognition technology to automatically assign categories, sub-categories, and tags to each image, making your product catalog more organized. You can customize the tags and choose translations to fit your needs.

The service also offers flexibility with custom profiles, allowing you to rename tags or add new ones based on your requirements. For pricing details and to see the service in action, check our API documentation or contact our support team for help with custom tagging and translations.
Visual Search for Home Decor: Find Products With Real-Life Photos
With our new Home Decor Search service, customers can use real-life photos to find visually similar items from your furniture and home decor catalogue.
Our tool integrates four key functionalities: home decor detection, product tagging, colour extraction, and visual search. It allows users to upload a photo, which the system analyzes to detect home decor items and match them with similar products from your inventory.

To use Home Decor Search, you first sync your database with Ximilar’s cloud collection. This involves processing product images to detect and tag items, and discarding the images immediately after. Once your data is synced, you can perform visual searches by submitting photos and retrieving similar products based on visual and tag similarity.
The API allows for customized searches, such as specifying exact objects of interest or integrating custom profiles to modify tag outputs. For a streamlined experience, Ximilar offers options for automatic synchronization and data mapping, ensuring your product catalog remains up-to-date and accurate.
The post New Solutions & Innovations in Fashion and Home Decor AI appeared first on Ximilar: Visual AI for Business.
]]>The post Predict Values From Images With Image Regression appeared first on Ximilar: Visual AI for Business.
]]>Let’s take a look at what image regression is and how it works, including examples of the most common applications. More importantly, I will tell you how you can train your own regression system on a no-code computer vision platform. As more and more customers seek to extract information from pictures, this new feature is sure to provide Ximilar’s customers with the tools they need to stay ahead of the curve in today’s highly competitive AI-driven market.
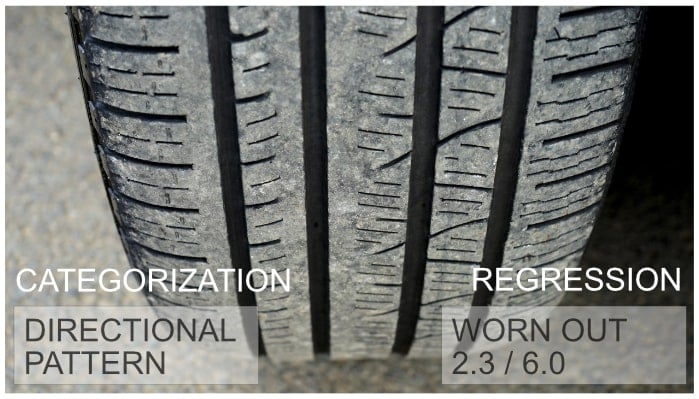
What is the Difference Between Image Categorization and Regression?
Image recognition models are ideal for the recognition of images or objects in them, their categorization and tagging (labelling). Let’s say you want to recognize different types of car tyres or their patterns. In this case, categorization and tagging models would be suitable for assigning discrete features to images. However, if you want to predict any continuous value from a certain range, such as the level of tyre wear, image regression is the preferred approach.
Image regression is an advanced machine-learning technique that can predict continuous values within a specific range. Whenever you need to rate or evaluate a collection of images, an image regression system can be incredibly useful.
For instance, you can define a range of values, such as 0 to 5, where 0 is the worst and 5 is the best, and train an image regression task to predict the appropriate rating for given products. Such predictive systems are ideal for assigning values to several specific features within images. In this case, the system would provide you with highly accurate insights into the wear and tear of a particular tyre.
How to Train Image Regression With a Computer Vision Platform?
Simply log in to Ximilar App and go to Categorization & Tagging. Upload your training pictures and under Tasks, click on Create a new task and create a Regression task.
You can train regression tasks and test them via the same front end or with API. You can develop an AI prediction task for your photos with just a few clicks, without any coding or any knowledge of machine learning.
This way, you can create an automatic grading system able to analyze an image and provide a numerical output in the defined range.
Use the Same Training Data For All Your Image Classification Tasks
Both image recognition and image regression methods fall under the image classification techniques. That is why the whole process of working with regression is very similar to categorization & tagging models.
Both technologies can work with the same datasets (training images), and inputs of various image sizes and types. In both cases, you can simply upload your data set to the platform, and after creating a task, label the pictures with appropriate continuous values, and then click on the Train button.

Apart from a machine learning platform, we offer a number of AI solutions that are field-tested and ready to use. Check out our public demos to see them in action.
If you would like to build your first image classification system on a no-code machine learning platform, I recommend checking out the article How to Build Your Own Image Recognition API. We defined the basic terms in the article How to Train Custom Image Classifier in 5 Minutes. We also made a basic video tutorial:
Neural Network: The Technology Behind Predicting Range Values on Images
The most simple technique for predicting float values is linear regression. This can be further extended to polynomial regression. These two statistical techniques are working great on tabular input data. However, when it comes to predicting numbers from images, a more advanced approach is required. That’s where neural networks come in. Mathematically said, neural network “f” can be trained to predict value “y” on picture “x”, or “y = f(x)”.
Neural networks can be thought of as approximations of functions that we aim to identify through the optimization on training data. The most commonly used NNs for image-based predictions are Convolutional Neural Networks (CNNs), visual transformers (VisT), or a combination of both. These powerful tools analyze pictures pixel by pixel, and learn relevant features and patterns that are essential for solving the problem at hand.
CNNs are particularly effective in picture analysis tasks. They are able to detect features at different spatial scales and orientations. Meanwhile, VisTs have been gaining popularity due to their ability to learn visual features without being constrained by spatial invariance. When used together, these techniques can provide a comprehensive approach to image-based predictions. We can use them to extract the most relevant information from images.
What Are the Most Common Applications of Value Regression From Images?
Estimating Age From Photos
Probably the most widely known use case of image regression by the public is age prediction. You can come across them on social media platforms and mobile apps, such as Facebook, Instagram, Snapchat, or Face App. They apply deep learning algorithms to predict a user’s age based on their facial features and other details.
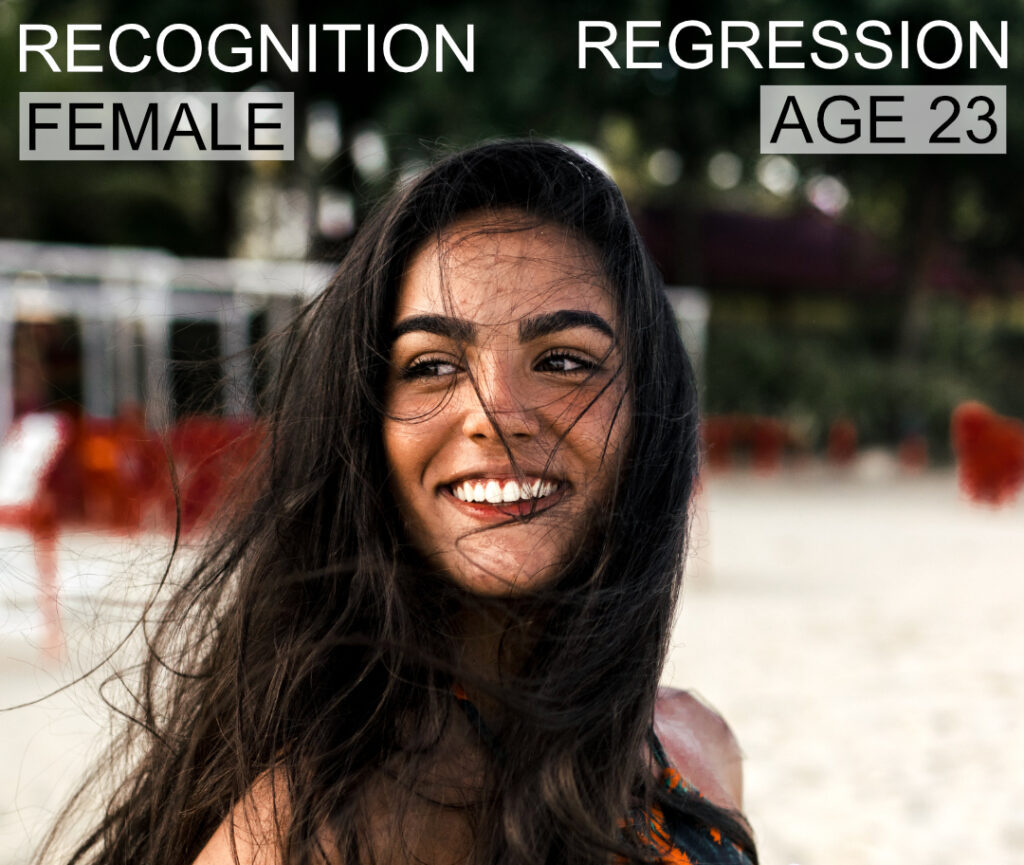
Needless to say, these plugins are not always correct and can sometimes produce biased results. Despite this limitation, various image regression models are gaining popularity on various social sites and in apps.
Ximilar already provides a face-detection solution. Models such as age prediction can be easily trained and deployed on our platform and integrated into your system.
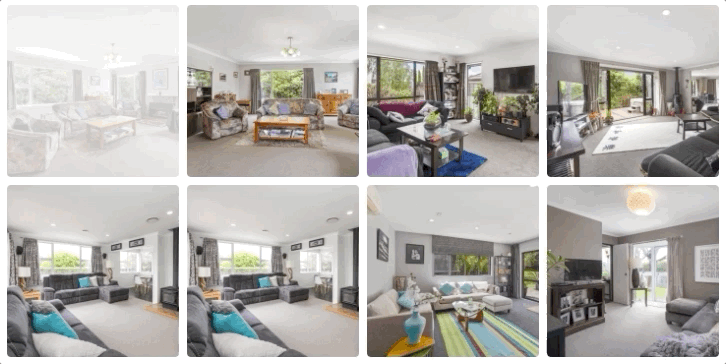
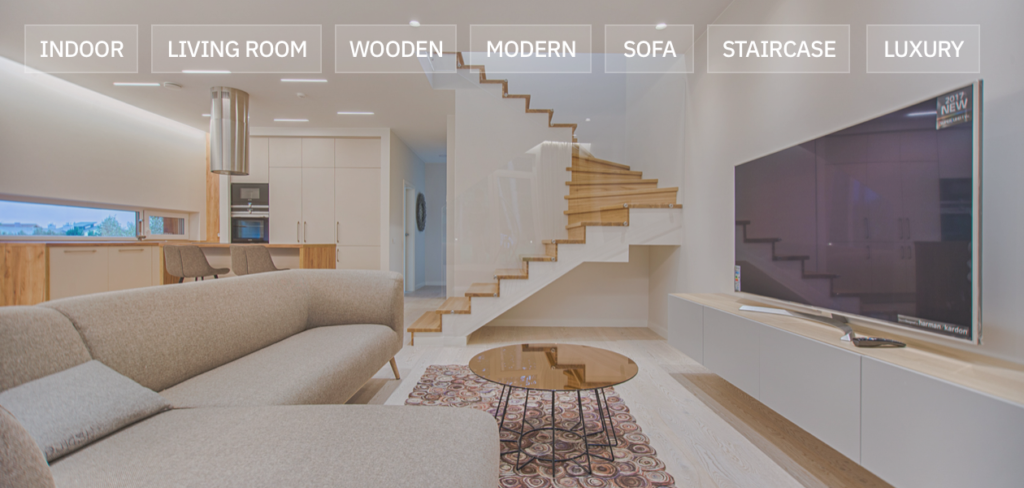
Value Prediction and Rating of Real Estate Photos
Pictures play an essential part on real estate sites. When people are looking for a new home or investment, they are navigating through the feed mainly by visual features. With image regression, you are able to predict the state, quality, price, and overall rating of real estate from photos. This can help with both searching and evaluating real estate.

Custom recognition models are also great for the recognition & categorization of the features present in real estate photos. For example, you can determine whether a room is furnished, what type of room it is, and categorize the windows and floors based on their design.
Additionally, a regression can determine the quality or state of floors or walls, as well as rank the overall visual aesthetics of households. You can store all of this information in your database. Your users can then use such data to search for real estate that meets specific criteria.
Determining the Degree of Wear and Tear With AI
Visual AI is increasingly being used to estimate the condition of products in photos. While recognition systems can detect individual tears and surface defects, regression systems can estimate the overall degree of wear and tear of things.
A good example of an industry that has seen significant adoption of such technology is the insurance industry. For example, startups-like Lemonade Inc, or Root use AI when paying the insurance.
With custom image recognition and regression methods, it is now possible to automate the process of insurance claims. For instance, a visual AI system can indicate the seriousness of damage to cars after accidents or assess the wear and tear of various parts such as suspension, tires, or gearboxes. The same goes with other types of insurance, including households, appliances, or even collectible & antique items.
Our platform is commonly utilized to develop recognition and detection systems for visual quality control & defect detection. Read more in the article Visual AI Takes Quality Control to a New Level.
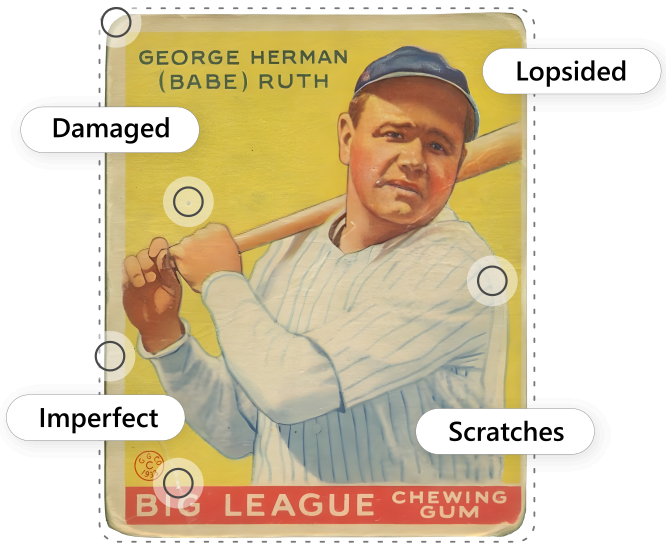
Automatic Grading of Antique & Collectible Items Such as Sports Cards
Apart from car insurance and damage inspection, recognition and regression are great for all types of grading and sorting systems, for instance on price comparators and marketplaces of collectible and antique items. Deep learning is ideal for the automatic visual grading of collector items such as comic books and trading cards.
By leveraging visual AI technology, companies can streamline their processes, reduce manual labor significantly, cut costs, and enhance the accuracy and reliability of their assessments, leading to greater customer satisfaction.
Automatic Recognition of Collectibles
Ximilar built an AI system for the detection, recognition and grading of collectibles. Check it out!
Food Quality Estimation With AI
Biotech, Med Tech, and Industry 4.0 also have a lot of applications for regression models. For example, they can estimate the approximate level of fruit & vegetable ripeness or freshness from a simple camera image.
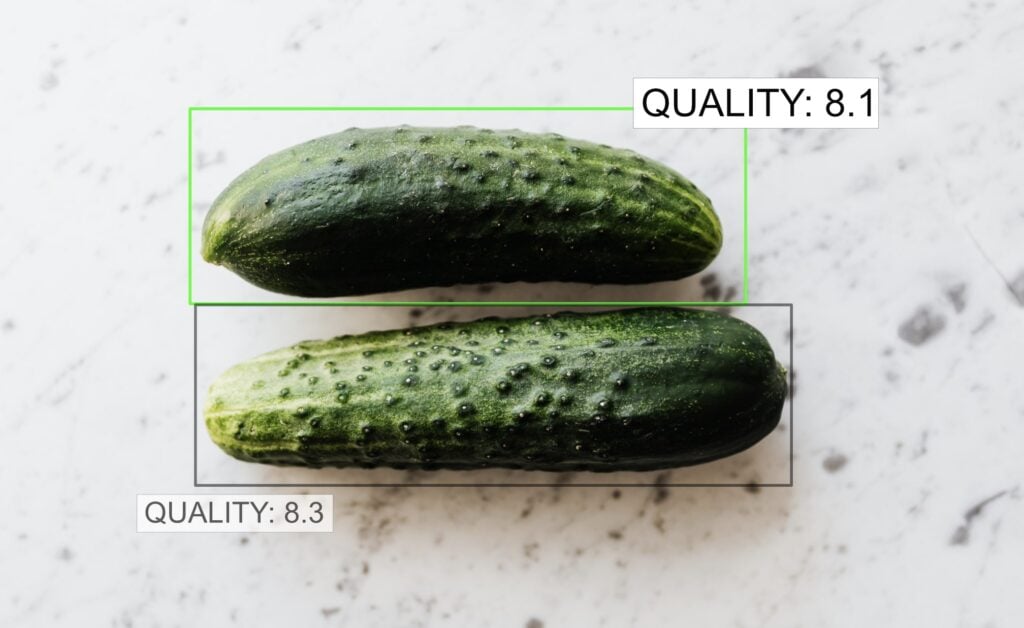
For instance, this Japanese farmer is using deep learning for cucumber quality checks. Looking for quality control or estimation of size and other parameters of olives, fruits, or meat? You can easily create a system tailored to these use cases without coding on the Ximilar platform.
Build Custom Evaluation & Grading Systems With Ximilar
Ximilar provides a no-code visual AI platform accessible via App & API. You can log in and train your own visual AI without the need to know how to code or have expertise in deep learning techniques. It will take you just a few minutes to build a powerful AI model. Don’t hesitate to test it for free and let us know what you think!
Our developers and annotators are also able to build custom recognition and regression systems from scratch. We can help you with the training of the custom task and then with the deployment in production. Both custom and ready-to-use solutions can be used via API or even deployed offline.
The post Predict Values From Images With Image Regression appeared first on Ximilar: Visual AI for Business.
]]>The post Image Similarity as a Service For Your Web appeared first on Ximilar: Visual AI for Business.
]]>The technology behind image similarity is robust, reliable & fast. Built on state-of-the-art (SOTA) AI models and vector databases, you can search millions of images/products in milliseconds. It is used by big e-commerce players as well as small startups for showing visual alternatives or finding products with pictures. Some of our customers have hundreds of millions of images in their collections and do more than 100 million requests per month. Let’s dive into building a superfast similarity search service for your web.
What is Image Similarity?
Image Similarity, or image similarity search, is a visual AI service comparing, grouping, and recommending visually similar images. For example, a typical use case is a product recommendation of similar items in e-shops. It can also be used for reverse image search, where the query is an external image and the results are images from the collection. This approach gives way more accurate results than searching by tags, labels and other attributes.
Ximilar is using state-of-the-art deep learning models for all visual search services. We build our own indexing & searching technology that can run both as a service or on your hardware if needed. The collections can be focused either on product photos, fashion, image matching, or generic photos (stock images).

Features of the Image Similarity Service
Here are several features of the Image Similarity service that we think are crucial:
- Simple access through the Ximilar App (creating a collection on click) and connection to REST API
- The scalable search service can handle collections with hundreds of millions of similar items (images, videos, etc.) and hundreds of requests per second with both CRUD operations and searching
- The ultra-fast and reliable engine that is mostly deployed in large e-commerce platforms – the query for finding the most visually similar product is low latency (in milliseconds)
- The service is customizable – the platform enables you to train your own model for visual similarity search
- Advanced filtering that supports JSON meta-data – if you need to restrict the result to a specific field
- Grouping based on similarity – our search technology can group photos of the same product as one item
- Security and privacy of your data – only meta-data and the visual representation of the images are stored, therefore your images are not stored anywhere
- The service is affordable and cost-effective both for startups and enterprises, offering free plan for tests as well as discounts with your growth over time
- We can deploy it on your hardware, independently of our infrastructure, and also offline – custom similarity model and deployment appropriate to your needs
- Our search engine and machine learning models improve constantly – maintaining much higher quality than any other open-source project & we are able to build custom search engines with trained models
Applications Using Visual Similarity
According to this research by Deloitte, merchandising with artificial intelligence is more and more relevant, and recommendation engines play a vital part in it. Here are a few use cases for visual similarity engines:
- E-shops that use product similarity to help customers to browse and find related products (e.g. in fashion & luxury items, home decor & furniture, art, wall art, prints & posters, collectible trading cards, comics, trademarks, etc.)
- Stock photo databases suggesting similar content – getting visual alternatives of photos, designs, product images, and videos
- Finding the exact products – apps like Vivino for finding wine or any kind of product are easy to develop for us
- Visual similarity duplicate finder (also image matching or deduplication), to know which images are already in your database, or which product photos you can merge together
- Reverse image search – finding a product or an image with a picture online
- Finding similar real estate based for example on interior design, furniture, garden, etc.
- Comparing two images for similarity – for example patterns or designs

Recommending products to your customers has several advantages. Firstly, it creates a better user experience and helps your customers find the right products faster. Secondly, it instantly makes the purchase rate on your web higher. This means a win on both sides – satisfied customers and higher revenue for you. Read more about customer experience and product recommendations in our blog post on fashion search.
Step by step: Building Real-Estate Image Search
Creating the Collection
So let’s take a look at how to easily build your own similarity search engine with the Ximilar platform. The first step is to log in to the Ximilar App. If you don’t have an account, then sign up – it’s free and takes just a minute. After that, on the Dashboard, click on the Visual Search tile and then the Image Similarity service. Then go to the Collections in the left menu and click on Create New Collection. It will show a pop-up with different collection types from which you need to select one.
The collection is a space where you upload your images. With this collection, you are performing queries for search. You can choose from Generic Photo Collection, Product Photo Collection, Dominant Colors Similarity, and Image Matching. Clicking on one of the cards will create a collection for your account.
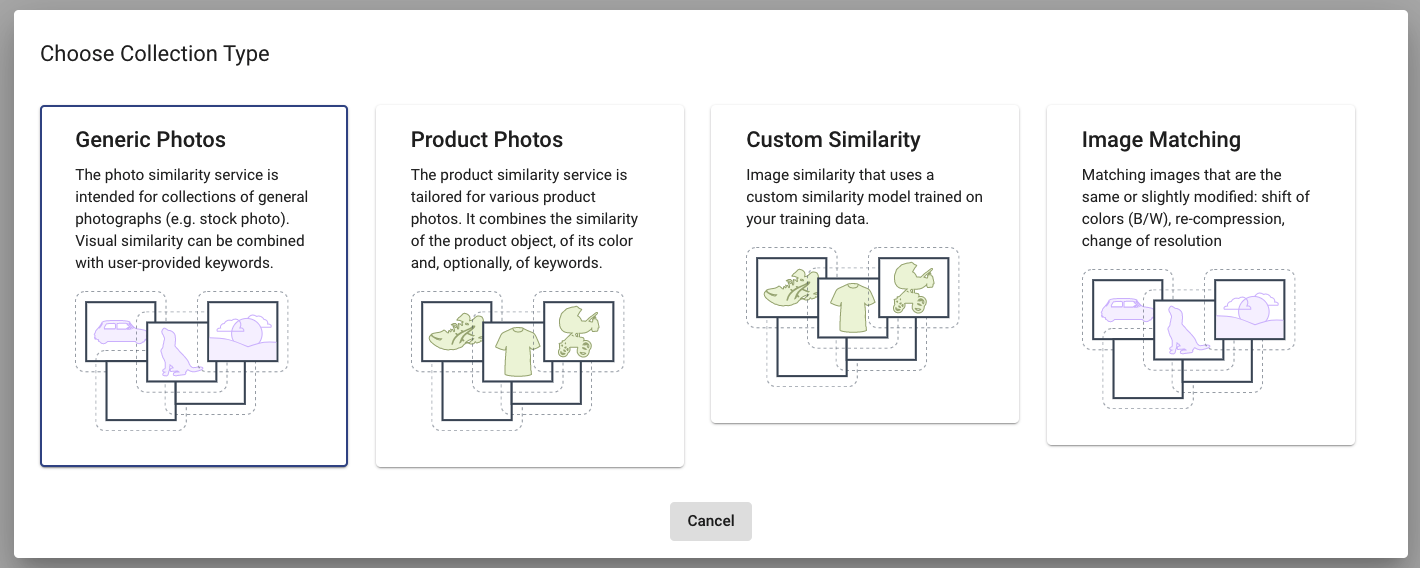
Each of these collection types is suitable for different types of images:
- Use Generic Photos if you work with stock photos
- Pick a Product Photos collection if you are an e-commerce company
- Select Image Matching to find duplicates in your images
- For the fashion sector, we recommend using a specialized service called Fashion Search
- Custom Similarity is suitable if you are working with another type of data (e.g. videos or 3D models). To do this, please schedule a call with us, and we will develop your own model tuned for your data. For instance, we built a photo search system for the Magic the Gathering Trading Cards for one of our customers.
For this example of real estate, I will use a Generic Photo Collection. The advantage of Generic Photo Collection is that it also supports searching images via text input/query. We usually develop custom similarity models for real estate, when the customers need specific and more accurate results. However, for this simple use case, the generic real estate model will be enough.
Format of Image Similarity Dataset

First, we need to prepare a text file with JSON records. Each record represents an image that we want to store/insert into our collection. The key field is "_url" with the image URL. The advantage of the _url is that you can directly see and inspect the results via app.ximilar.com.
You can also optionally send records with base64 data, this is great if your data are stored locally on your computer. Don’t worry, we are not storing the whole images (data or base64) in the collection database, just URLs with all other metadata present in the records.
The JSON records look like this:
{"_id": "1_1", "_url": "_URL_IMAGE_PATH_", "estate_id": "1", "category": "indoor", "subcategory": "kitchen", "tags": []}
{"_id": "1_2", "_url": "_URL_IMAGE_PATH_", "estate_id": "1", "category": "indoor", "subcategory": "kitchen", "tags": []}
...
If you don’t have image URLs, you can use either "_file" or "_base64" fields for the image data (locally stored "_file" data are automatically converted by the Python client to base64). The image similarity engine is indexing every record of the collection by extracting a representation from the image by a neural network model. However, we are not storing the images in our engine. So, only records that contain "_url" will be visualized in the Ximilar App.
You must store unique identifiers of each image in the "_id" field to identify your images in the collection. The value of this field must be a string. The API endpoint for searching is returning this _id values, that is how you get the results for visual search. You can also store additional fields for every JSON record, and then you can use these fields for filtering, grouping, and tuning the similarity function (see below).
Filling the Collection With Your Data
The next step requires a few lines of code. We are going to insert the prepared images into our collection using our python-client library. You can install the library using pip or directly from GitLab. The usage of the client is very straightforward and basically, you can just use the script tools/collections/insert_json_records.py:
python insert_json_records.py --type generic --auth_token __YOUR_TOKEN__ --collection_id __COLLECTION_ID__ --path /path/to/the/file.json
You will find the collection ID and the Authorization token on the “collection page” in the Ximilar App. This script will run for a few minutes, depending on the size of your image dataset.
Result: Finding Visually Similar Pictures
That was pretty easy, right? Now, if you go to the collections page, you will see something like this:
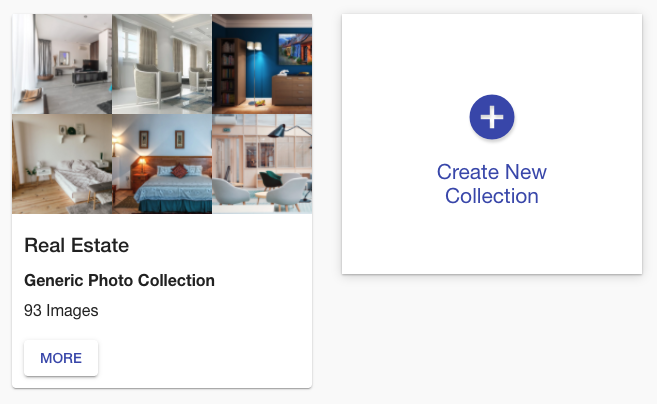
All images from the JSON file were indexed, and now you can inspect the collection in the Ximilar App. Select the Similarity Search in the left menu of the Image Similarity service and test how the similarity works. You can specify the query image either by upload, by URL, or your IDs, or by choosing one of the randomly selected images from the collection.
Even though we have indexed just several hundred images, you can see that the similarity engine works pretty well. The first image is the query image and the next images are the k-nearest to the query image:
Rest API Connection for Image Search
The next step might be to integrate the service into your application via API. You can either directly use the REST API for searching visually similar images or, if you are using Python, we recommend our Python SDK client like this:
# pip install ximilar-client
from ximilar.client import SimilarityPhotosClient
client = SimilarityPhotosClient("_API_TOKEN_", "_COLLECTION_ID_")
# search k nearest items
client.search({"_id": "1"}, k = 3)
# search by external image
client.search({"_url": "_URL_PATH_"})
Advanced Features for Photo Similarity
The search for visually similar images can be combined with filtering on metadata. This metadata can be stored in the JSON, as in our example with the "category" and "subcategory" fields. In the API, the filtering is specified using a MongoDB-like syntax – see the documentation.
For example, let’s say that we want to search for images similar to the image with ID=1_1 that are indoor photos made in a kitchen. We assume that this meta-information is stored in the “category” and “subcategory” fields of every JSON record. The query will look like this:
client.search({"_id": "1_1"}, filter={"category": "Indoor", "subcategory": "Kitchen"})
If we know that we will often filter on some fields, we can specify them in the “Fields to index” option of the collection to make the query processing more efficient.

Often, your data contains several photos of one “object” – a product or, in our example, real estate. Our service can group the search results not by individual photos but by product IDs. You can set this in the advanced options of the collection by specifying the name of the real estate in the Product ID field, and the magic will happen.
Enhancing Image Similarity Engine with Tags
The image similarity is based purely on the visual content of the image. However, you can use your tags (labels, keywords) to enhance the similarity search. In the example, we assume that the data already contains categories, subcategories, and tags. In order to enhance the visual similarity search with tags, you can fill the “tags” field for every record with your tags, and also use method /v2/visualTagsKNN. After that, your search results will be based on a combination of visual similarity and keywords.
If you don’t have categories and tags, you can create your own photo tagger through our Image Recognition service, and enrich your image data automatically before indexing. The possibilities of image recognition models and their combinations are endless, resulting in highly customizable solutions. Read our guide on how to build your own Image Recognition API.
You can build several models:
- One classifier for categorizing indoor/outdoor/floor plan photos
- One classifier for getting room type (Bedroom, Kitchen, Living room, etc.)
- One tagger for outdoor tags like (Pool, Garden, Garage, House view, etc.)
To Sum Up
The real estate photo similarity search is only one use case of visual similarity from many (fashion, e-commerce, art, stock photos, healthcare…). We hope that you will enjoy working with this service, and we are looking forward to seeing your projects based on it. Thanks to our developers Libor and Ludovit, you can use this service through the frontend app.
Visual Similarity service by Ximilar is unique in terms of search quality, speed performance, and all the possibilities of the API. Our engineers are constantly upgrading the quality of the search, so you don’t have to. We are able to build custom solutions suitable for your data. With multiple collections, you can even A/B test the performance on your websites. This can run in our cloud as SaaS or in your warehouse! If you have more questions about pricing, and technical details, or you would like to run the similarity search engine on your own machines, then contact us.
The post Image Similarity as a Service For Your Web appeared first on Ximilar: Visual AI for Business.
]]>The post How to Build Your Own Image Recognition API? appeared first on Ximilar: Visual AI for Business.
]]>For example, recently, I had a conversation with a client who said that Google Vision didn’t work for him, and it returned non-relevant tags. The problem was not the API but the approach to it. He employed a few students to do the labelling job and create an image classifier. However, the results were not good at all. After showing him our approach, sharing some tips and simple rules, he got better classification results almost immediately. This post should serve as a comprehensive guide for those, who build their own image classifiers and want to get the most out of it.
How to Begin
Image recognition is based on the techniques of machine learning and computer vision. It is able to categorize and tag images with tags describing the attributes recognized in them. You can read everything about the service and its possibilities here.
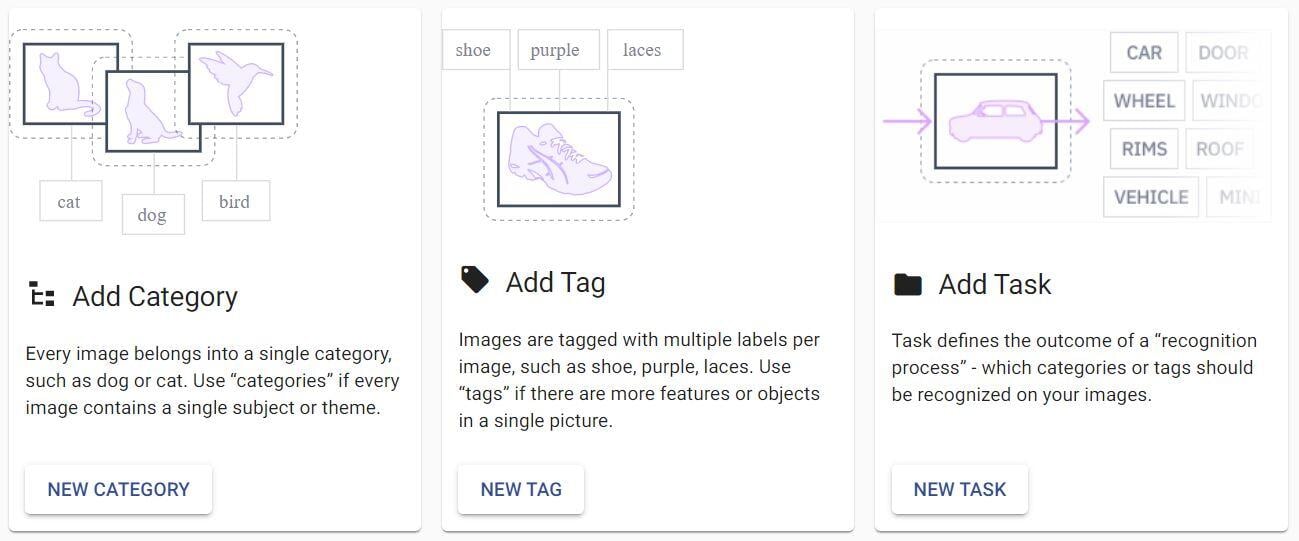
To train your own Image Recognition models and create a system accessible through API, you will first need to upload a set of training images and create your image recognition tasks (models). Then you will use the training set to train the models to categorize the images.
If you need your images to be tagged, you should upload or create a set of tags and train tagging tasks. As the last step, you can combine these tasks into a Flow, and modify or replace any of them anytime due to its modular structure. You can then gradually improve your accuracy based on testing, evaluation metrics and feedback from your customers. Let’s have a look at the basic rules you should follow to reach the best results.
The Basic Rules for Image Recognition Models Training
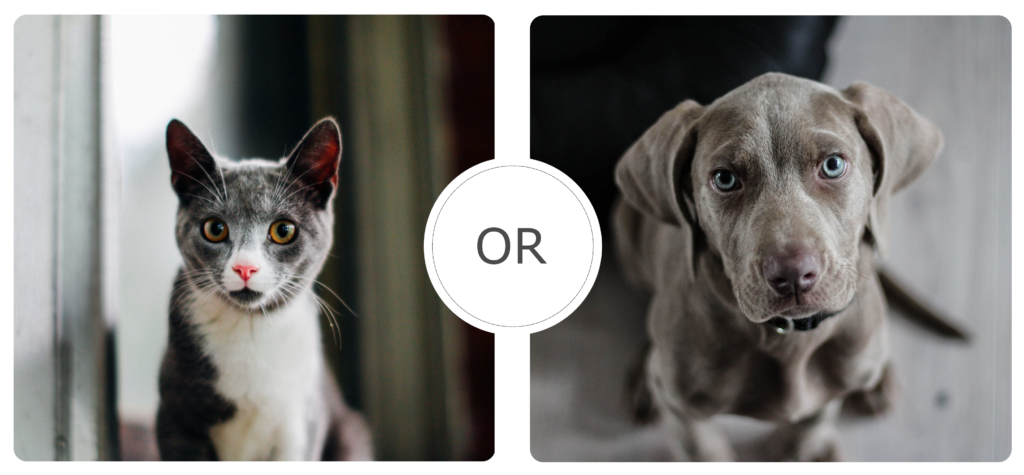
Each image recognition task contains at least two labels (classes, categories) – e.g., cats and dogs. A classic image recognition model (task) assigns one label to each image – so the image is either a cat or dog. In general, the more classes you have, the more data you will need to teach the neural network to predict labels.
The training images should represent the real data that will be analyzed in a production setting. For example, if you aim to build a medical diagnostic tool helping radiologists identify the slightest changes in the lung tissue, you need to assemble a database of x-ray images with proven pathological findings. For the first training of your task, we recommend sticking to these simple rules:
- Start with binary classification (two labels) – use 50–100 images/label
- Use about 20 labels for basic and 100 labels for more complex solutions
- For well-defined labels use 200+ images/label
- For hard to recognize labels add 100+ images/label
- Pattern recognition – for structures, x-ray images, etc. use 50–100 images/label
Always keep in mind, that training one task with hundreds of labels on small datasets almost never works. You need at least 20 labels and 100+ images per label to start with to achieve solid results. Start with the recommended counts, and then add more if needed.
The Difference Between Testing & Production
The users of Ximilar App can train tasks with a minimum of 20 images per label. Our platform automatically divides your input data into two datasets – training & test set, usually in a ratio of 80:20. The training set is used to optimize the parameters of the classifier. During the training, the training images are augmented in several ways to extend the set.
The test data (about 20 %) are then used to validate and measure accuracy by simulating how the model will perform in production. You can see the accuracy results on the Task dashboard in Ximilar App. You can also create an independent test dataset and evaluate it. This is a great way to get accurate results on a dataset that was not seen by the model in the training before you actually deploy it.
Remember, the lower limit of 20 images per label usually leads to weak results and low accuracy. While it might be enough for your testing, it won’t be enough for production. This is also called overfitting. Most of the time the accuracy in Ximilar is pretty high, easily over 80 % for small datasets. However, it is common in machine learning to use more images for more stable and reliable results in production. Some tasks need hundreds or thousands of images per label for the good performance of your production model. Read more about the advanced options for training.
The Best Practices in Image Recognition Training
Start With Fewer Categories
I usually advise first-time users to start with up to 10 categories. For example, when building an app for people to recognize shoes, you would start with 10 shoe types (running, trekking, sneakers, indoor sport, boots, mules, loafers …). It is easier to train a model with 10 labels, each with 100 training images of a shoe type, than with 30 types. You can let users upload new shoe images. This way, you can get an amazing training dataset of real images in one month and then gradually update your model.
Use Multiple Recognition Tasks With Fewer Categories
The simpler classifiers can be incredibly helpful. Actually, we can end up with more than 30 types of shoes in one model. However, as we said, it is harder to train such a model. Instead, we can create a system with better performance if we create one model for classifying footwear into main types – Sport, Casual, Elegant, etc. And then for each of the main types, we create another classifier. So for Sport, there will be a model that classifies sports shoes to Running shoes, Sneakers, Indoor shoes, Trekking shoes, Soccer shoes, etc.
Use Binary Classifiers for Important Classes
Imagine you are building a tagging model for real estate websites, and you have a small training dataset. You can first separate your images into estate types. For example, start with a binary classifier that separates images to groups “Apartment” and “Outdoor house”. Then you can train more models specifically for room types (kitchen, bedroom, living room, …), apartment features, room quality, etc. These models will be used only if the image is labelled as “Apartment”.
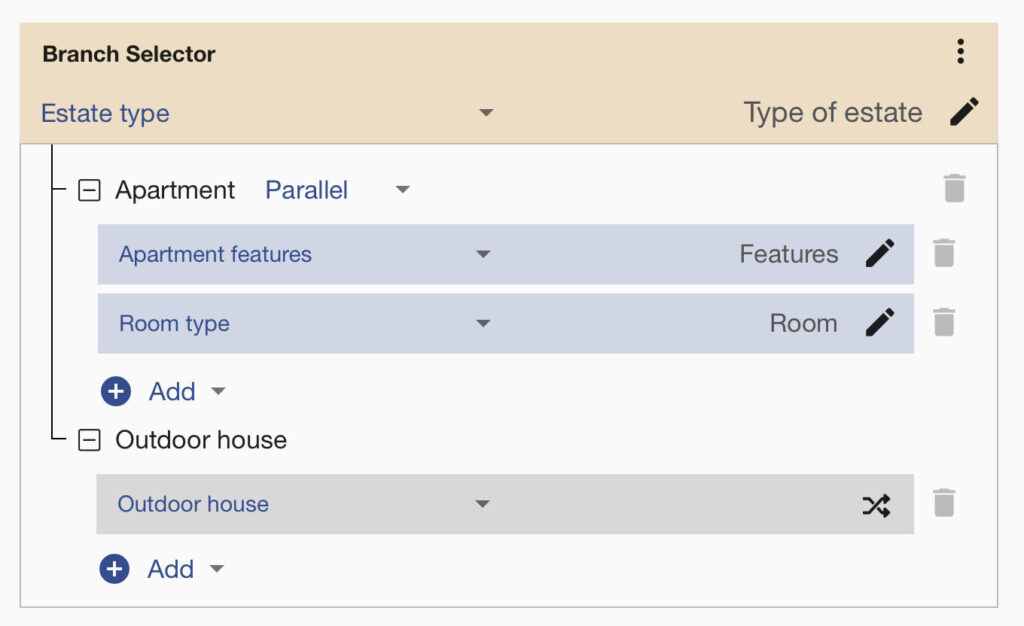
You can connect all these tasks via the Flows system with a few clicks. This way, you can chain multiple image recognition models in one API endpoint and build a powerful visual AI. Typical use cases for Flows are in the e-commerce and healthcare fields. Systems for fashion product tagging can also contain thousands of labels. It’s hard to train just one model with thousands of labels that will have good accuracy. But, if you divide your data into multiple models, you will achieve better results in a shorter time! For labelling work, you can use our image Annotation system if needed.
Choose Your Training Images Wisely
Machine learning performs better if the distribution of training and evaluated pictures is even. It means that your training pictures should be very visually similar to the pictures your model will analyze in a production setting. So if your model will be used in CCTV setting, then your training data must come from CCTV cameras. Otherwise, you are likely to build a model that has great performance on training data, but it completely fails when used in production.
The same applies to Real Estate and other fields. If the system analyzes images of real estate that were not made only by professional photographers, then you need to include photos from smartphones, with bad lighting, blurry images, etc.
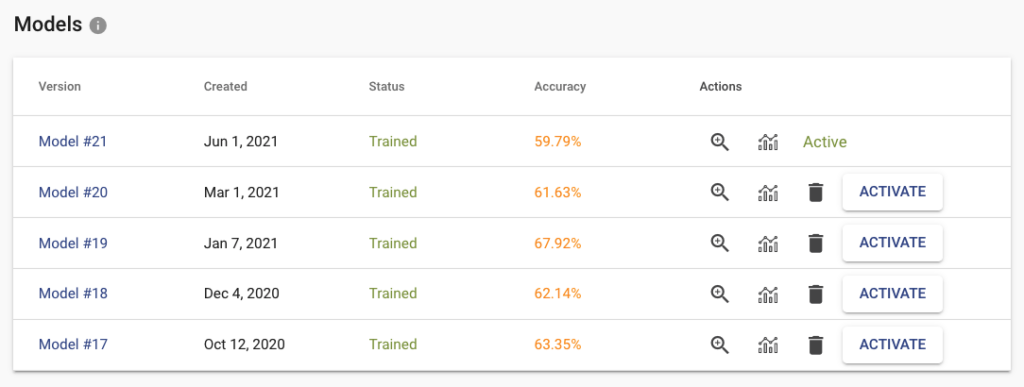
Improving the Accuracy of the System
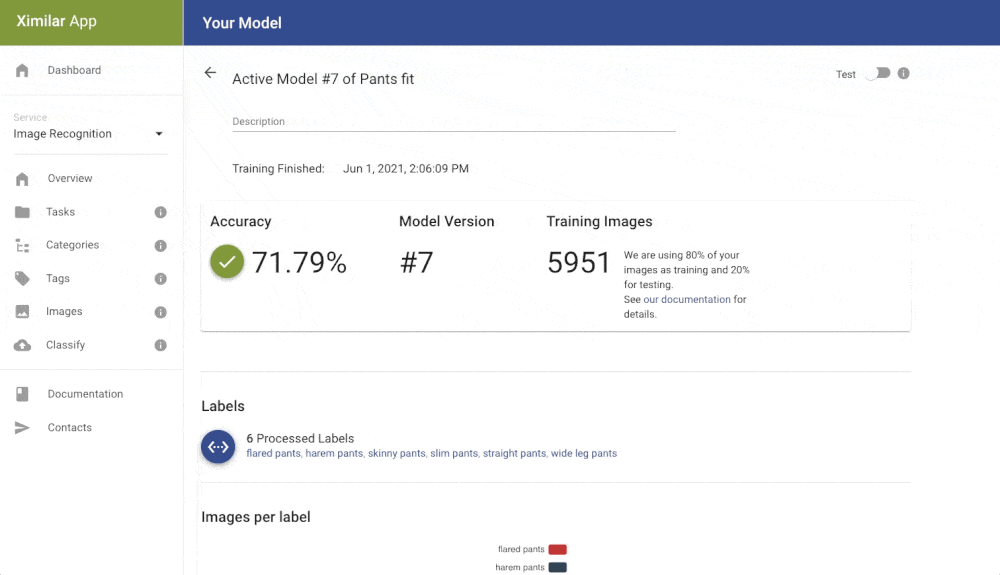
When clicking on the training button on the task page, the new model is created and put in the training queue. If you upload more data or change labels, you can train a new model. You can have multiple versions of them and deploy to the API only specific version that works best for you. Down on the task page, you can find a table with all your trained models (only the last 5 are stored). For each trained model, we store several metrics that are useful when deciding which model to pick for production.
Inspect the Results and Errors
Click on the zoom icon in the list of trained models to inspect the results. You can see the basic metrics: Accuracy, Recall, and Precision. Precision tells you what is the probability that the model is right if it predicts a specific label. Recall tells you how likely is the prediction correct. If we have high recall but lower precision for the label “Apartment” from our real estate example, then the model is probably predicting on every image that it is “Apartment” (even on the images that should be “Outdoor house”). The solution is probably simple – just add more pictures that represent “Outdoor house”.
The Confusion matrix shows you which labels are easily confused by the trained model. These labels probably contain similar images, and it is therefore hard for the model to distinguish between them. Another useful component is Failed Images (misclassified) that show you the model’s mistake on your data. With Failed images, you can also see labelling mistakes in your data and fix them immediately. All of these features will help you build a more reliable model with good performance.
Reliability of the Image Recognition Results
Every client is looking for reliability and robustness. Stay simple if you aim to reach high accuracy. Build models with just a few labels if you can. For more complex tagging systems use Flows. Building an image classifier with a limited number of training images needs an iterative approach. Here are a few tips on how to achieve high accuracy and reliable results:
- Break your large task into simple decisions (yes or no) or basic categories (red, blue and green)
- Make fewer categories & connect them logically
- Use general models for general categories
- Make sure your training data represent the real data your model will analyze in production
- Each label should have a similar amount of images, so the data will be balanced
- Merge very close classes (visually similar), then create another task only for them, and connect it via Flows
- Use both human and UI feedback to improve the quality of your dataset – inspect evaluation metrics like Accuracy, Precision, Recall, Confusion Matrix, and Failed Images
- Always collect new images to extend your dataset
Summary for Training Image Recognition Models
Building an image classifier requires a proper task definition and continuous improvements of your training dataset. If the size of the dataset is challenging, start simple and gradually iterate towards your goal. To make the basic setup easier, we created a few step-by-step video tutorials. Learn how to deploy your models for offline use here, check the other guides, or our API documentation. You can also see for yourself how our pre-trained models perform in the public demo.
We believe that with the Ximilar platform, you are able to create highly complex, customizable, and scalable solutions tailored to the needs of your business – check the use cases for quality control, visual search engines or fashion. The basic features in our app are free, so anyone can try it. Training of image recognition models is also free with Ximilar platform. You are simply paying only for calling the model for prediction. We are always here to discuss your custom projects and all the challenges in person or on a call. If you have any questions, feel free to contact us.
The post How to Build Your Own Image Recognition API? appeared first on Ximilar: Visual AI for Business.
]]>The post How Image Recognition Helps Automate Content Management and Drives Sales in E-commerce appeared first on Ximilar: Visual AI for Business.
]]>Progress in artificial intelligence and computer vision now allows these companies to automate part of their content team and vastly improve their listings while driving up sales.
E-commerce competition is fierce
Huge retailers sell near commoditized items, and consumers are looking for a more personalized experience. They want to buy unique products cheaply. E-commerce sites need to improve their listings and offer the most relevant items to potential buyers. Vast content management teams must manually go through never-ending feeds of items from suppliers. It is manual and tedious work.
E-commerce sites need to improve their listings and offer the most relevant items to the potential buyer.
How can image recognition help?
The solution is to use custom image recognition. E-commerce sites can easily train their own image recognizers. You can integrate the Ximilar platform to process the vast and dynamic product catalogue. You can fine-grain categorize the products or listing and offer customers quickly find what they are looking for. It also allowed automation of the routine and tedious work of the content management team, who could focus on more quality work of content creation and automated categorization.
Using deep learning-based image recognition allows you to recognize very specific features of the products — like whether the chair has armrests or not or what kind of face a bed has. Users on your website can then easily specify what they are looking for and filter the product listing accordingly — driving up the sales.
How can visual search help?
Your customers can find alternatives that are recommended by our visual search system. Simply said, your e-commerce site will offer better & faster navigation of your product catalogues, whether it is a home decor item or a real estate listing. This significantly improves customer experience and, in the end, the revenues generated by your shop.
How can AI image tools help?
Always show images and content on your site with the highest quality possible. Our Image Upscaler API can enhance and improve the photos that you are presenting on your real estate site or e-commerce platform.
In short.
Implementing visual artificial intelligence delivers real value to e-commerce and real estate sites. Cutting down content team costs, allowing for better customer engagement and driving up sales.
Ximilar offers tools for real estate and e-commerce websites to easily implement image recognition, such as described above. Improve the content management of your e-commerce site.
The post How Image Recognition Helps Automate Content Management and Drives Sales in E-commerce appeared first on Ximilar: Visual AI for Business.
]]>